Monday, April 28, 2014

How to Make Homemade Liquid Hand Soap

Go Green in 2014: Week 17


Get one full gallon of liquid hand soap for less than $10

Once you get used to the stringy, egg-white texture and the absence of lather, it's really not so bad. I know this from experience. In fact, I prefer my homemade hand soap to any brand you might find in a store.

Most commercial liquid hand soaps contain toxic ingredients, like sodium lauryl sulfate, which is actually not necessary to get your hands clean. This is why I decided to start making my own soap - using only two ingredients. You only need a couple bars of non-toxic soap (I like using Dr. Bronner's pure castile soap) and a gallon of water.

Alternatively, you could use Dr. Bronner's liquid all-one soap diluted with water for hand-washing; the following recipe just makes a thicker, creamier hand soap.


You can buy the bars here: Dr. Bronner's Magic Soaps Pure Castile Soap

List of ingredients and tools

  • One gallon distilled water - less than $1
  • Two bars Dr. Bronner's (or your choice) castile bar soap - approximately $4 each
  • Cheese grater
  • Large pot
  • Kitchen funnel

How to make liquid hand soap

Note: While this soap is easy to make, it does take a full day to set, so keep this in mind before starting to make it.

Use your cheese grater to grate both bars of soap into a small bowl.

Grating the bars of soap is a bit tedious


Heat the water in a large pot until it is almost boiling (and make sure you save the gallon jug for later!). Reduce the heat to low and slowly add the grated soap, stirring until it is all dissolved.

After the soap dissolves, it will be watery with bubbles on top

Remove from the heat and let sit for 24 hours, stirring occasionally.

After 12 hours, it will be thicker and slightly chunky

After 24 hours, it will have completely thickened

After 24 hours, stir one more time and use the funnel to carefully transfer the liquid soap into the gallon jug. I didn't have quite enough to fill the jug because I had spilled some. Oops!  You will definitely want someone to help out with this part.


Label to make sure nobody mistakes it for a gallon of milk, and store at room temperature until needed.


Did you try this recipe for liquid soap? What did you think of it? It can feel strange to wash your hands with it at first, but after using it regularly, it will seem completely normal.

Tip: This soap makes a great gift, and I have given dispensers filled with it as Christmas and Mother's Day gifts. I haven't heard any complaints yet!

~ ~ ~

**Disclosure: Although this post may contain affiliate links, all opinions are my own.

Your challenge: This week, make a batch of non-toxic liquid hand soap, and use it to replace your regular soap once it runs out.
______________________________________________________

**This post is part of a weekly challenge {Go Green in 2014}, during which the author has challenged herself - and you - to find 52 ways to lead a greener life in 2014. You can follow the weekly posts on this page.**

Monday, April 21, 2014

Green Challenge: Unplugging the Microwave

Go Green in 2014: Week 16

Jason V / https://www.flickr.com/photos/jmv/
Unplugging the microwave...and other household appliances

This past week, my challenge was to unplug the microwave and to find alternative ways to cook and reheat all of our food - then to decide whether it was worth it.

First, let's go over how the week went:

Not long after unplugging the microwave, I needed (wanted?) to warm up a cup of coffee. I walked straight to it before remembering that it wasn't plugged in. In an attempt to creatively reheat my coffee, I ran another small cup through the Keurig using the same K-cup (Yeah, I know, K-cups are not very green. I'll tackle that problem later.). It was a little watery, but it worked. The coffee was at least a little warmer.

A couple days later, Dan went to the microwave to heat up some bacon for breakfast. Unfortunately, he had to waste a clean pan to fry it up on the stove instead. Throughout the week, we have had to cook our veggies on the stove and either bake our main dishes in the oven on throw them on the grill. I ended up reheating all my leftovers in the oven.

All in all, it is definitely possible to live without a microwave - people did it for a long time before their invention!

If you don't have a microwave, read this article I wrote on How to Survive without a Microwave.

What are the benefits of unplugging the microwave?

*Some people are concerned about losing nutrients by cooking food in the microwave. From what I have read, it doesn't seem to have a profound effect. Vegetables will lose some nutrients no matter how they are cooked; the key is to avoid overcooking them. However, it's up to you to decide whether you feel comfortable using the microwave or not.

*You can save a little money by keeping it unplugged. It's not a significant amount, even when on standby. However, if you find yourself able to keep it unplugged all the time, every penny saved is an extra penny in your pocket. On the other hand, you will need to use other sources of energy to heat up your food.

*You might be concerned about the radiation emitted by microwaves. Some research suggests that there may be a link between microwave radiation and cancer, while other studies cannot find one. If you can live without it, all the better for you.

Sure, I can live without a microwave. But we will be plugging ours back in simply because it does save a lot of time when reheating leftovers at lunchtime on workdays. Still, I tend to lean toward other methods for reheating certain types of food, simply because the microwave can turn them into a pile of mush.

There is one thing this challenge did inspire me to do, though: I have been consciously starting to unplug some of our appliances and household items, such as the toaster, to save energy when they aren't in use.

~ ~ ~

Your challenge: This week, attempt to make everything without the use of a microwave; unplug it to save energy.
______________________________________________________

**This post is part of a weekly challenge {Go Green in 2014}, during which the author has challenged herself - and you - to find 52 ways to lead a greener life in 2014. You can follow the weekly posts on this page.**

Monday, April 14, 2014

Homemade Body Scrub Recipe for Naturally Smooth Skin

Go Green in 2014: Week 15


As the weather warms up, we start to shed our layers of clothes, and in doing so, our rough, dry winter skin is revealed. In preparation for the summer ahead, it's easy to soften and smooth our skin - and we can do it easily with items found in the kitchen.

However, because the skin is the largest organ of the body, it is important to avoid rubbing chemical-laden products on it. The skin readily absorbs chemicals and toxins from store-bought body scrubs into the bloodstream. As we have already learned in the previous weeks, this is not a good thing.

First of all, why  use a scrub?

Although too much scrubbing can be damaging to the skin, occasional gentle exfoliation is a wonderful way to improve circulation and reduce stress. It also sloughs off old skin cells to promote the growth of new ones, and it gives the skin a healthy glow. Plus, it is cheap and easy to make your own at home!

What you will need:

  • Sugar (white or brown) or salt (sea, epsom, table)
  • Oil (grapeseed, sweet almond, coconut, jojoba, avocado, olive, safflower)
  • Essential oil (optional)
  • Herbs (optional)

How to make homemade body scrub

  1. Place one cup salt or sugar in a bowl. Start adding your chosen oil, a small amount at a time. Use a small spoon to mix the salt or sugar and oil as you go. For my hand and foot scrub, I used table salt and olive oil.
  2. Once you have reached your desired consistency, you have the option to add a few drops of your chosen essential oil. I chose to add approximately 10 drops peppermint oil for an invigorating scent.
  3. If desired, you can also add a tablespoon of dried herbs. Mix well. I had a few packets of peppermint tea on hand, so I broke open a bag and mixed the contents into my scrub.
  4. After everything has been mixed together, spoon the mixture into a container of your choice. I found that a wide-mouth mason jar works well.
That's it! Quick and easy, and it costs very little to make. I keep my jar of scrub in the bathroom, and only place it in the shower when I am planning on using it. If you are using a glass container, be very careful, because glass can get slippery and could be dangerous if it breaks while you are showering.

Note: Body scrubs are perfect to use on your legs before shaving; it will help you get a closer shave for smooth summer legs. After shaving, try my homemade whipped body butter recipe for extra soft skin.

Another note: Body scrubs make great gifts when placed in a mason jar and adorned with a bit of ribbon or a piece of colorful fabric.

If you need recipe ideas, you will find a lot of wonderful scrub recipes and helpful hints in this ebook:


Most of the scrub recipes are not suitable for use on the face. If you wish to make a face scrub, try using sugar and a small amount of oil or honey.

~ ~ ~

**Disclosure: Although this post may contain affiliate links, all opinions are my own.

Your challenge: This week, make your own body scrub to naturally smooth your skin in preparation for the summer ahead.
______________________________________________________

**This post is part of a weekly challenge {Go Green in 2014}, during which the author has challenged herself - and you - to find 52 ways to lead a greener life in 2014. You can follow the weekly posts on this page.**

Monday, April 7, 2014

Green Cleaning Tips for Sparkling Windows

Go Green in 2014: Week 14

Allen McGregor / https://www.flickr.com/photos/allenmcgregor/

After a long winter, it can feel good to scrub the windows, inside and out, during spring cleaning. After I finish each window, I like to leave it open for the rest of the day (as long as it's nice outside) and air out the entire house.

But as we have discovered in the past few weeks, the chemicals in commercial cleaning products are not healthy for you or for the environment. Fortunately, it's easy to make your own green cleaning products for sparkling windows.

Green Window Cleaner Recipe


Ingredients:

  • 1/4 cup distilled white vinegar
  • 1/2 teaspoon mild liquid dish soap

Directions:

  1. For interior windows, mix the ingredients together in a large spray bottle. Fill with water (approximately two cups) and shake to combine. Spray onto windows and wipe dry with a clean, lint-free cloth.
  2. For exterior windows, mix the ingredients together in a gallon bucket. Double the ingredients for particularly grimy windows. Fill the bucket with warm water and apply to the windows with a cotton rag. Wipe dry with a clean, lint-free cloth.

If you have some newspaper lying around, I have heard that you can use it to get a streak-free finish. Simply rub the cleaning solution onto the windows using a newspaper, first in a circular motion, then horizontally and vertically. I haven't tried it yet, but I will be starting my spring cleaning soon. One of these days....

That's it - sounds easy, but it's a big job if you have lots of windows!

~ ~ ~

Your challenge: This week, get sparkling windows without harsh chemicals.
______________________________________________________

**This post is part of a weekly challenge {Go Green in 2014}, during which the author has challenged herself - and you - to find 52 ways to lead a greener life in 2014. You can follow the weekly posts on this page.**

Monday, March 31, 2014

Green Your Period With Reusable Feminine Products

Go Green in 2014: Week 13


Reusable menstrual products? Gross.

I'm sure that's what you're thinking right now. It's really not as disgusting as  you might think, though.

Because this is such a personal topic, I'll try to keep it professional. I will simply go over a couple of your reusable product options and list the pros and cons of each, as well as some tips for using them. If you're still uncomfortable, feel free to skip out on this post. I promise I won't be offended. In fact, I won't even know.

If you're still here, you're probably interested in learning more, which is a good thing. Disposable pads and tampons are not good for us or for the environment. I'm sure you can guess why they're bad for the environment. But did you know that they contain chemicals that are not at all good to use in such a sensitive area? Not only do they potentially contain "fragrances", which some of us may react to, but also other chemicals that are absorbed directly into the bloodstream through the skin.


If you experience skin (or other types of) sensitivities around that "time of the month", you might benefit from switching to reusable feminine products.

Menstrual cup


Until recently, I had never even heard of a menstrual cup. There are many different brands of cups, which are made of soft silicone. They are sort of a replacement for tampons, and are actually safer because they don't contain harmful chemicals. Plus, they catch your flow, rather than absorbing it, eliminating the risk of toxic shock syndrome.

There is a bit of a learning curve when it comes to using them, though. You definitely need to be comfortable with inserting it, which can take a while to get used to. In fact, even after a few months, I still haven't actually been able to use it for a full day.

I chose the Sckoon cup because it seemed to have the best reviews as far as comfort and not being able to feel it. They cost around $36, which isn't cheap, but it can be used for several years. You have two sizes to choose from: the smaller one is for women who haven't had a vaginal birth, and the other is slightly larger for women who have already given birth vaginally.

How to use a menstrual cup

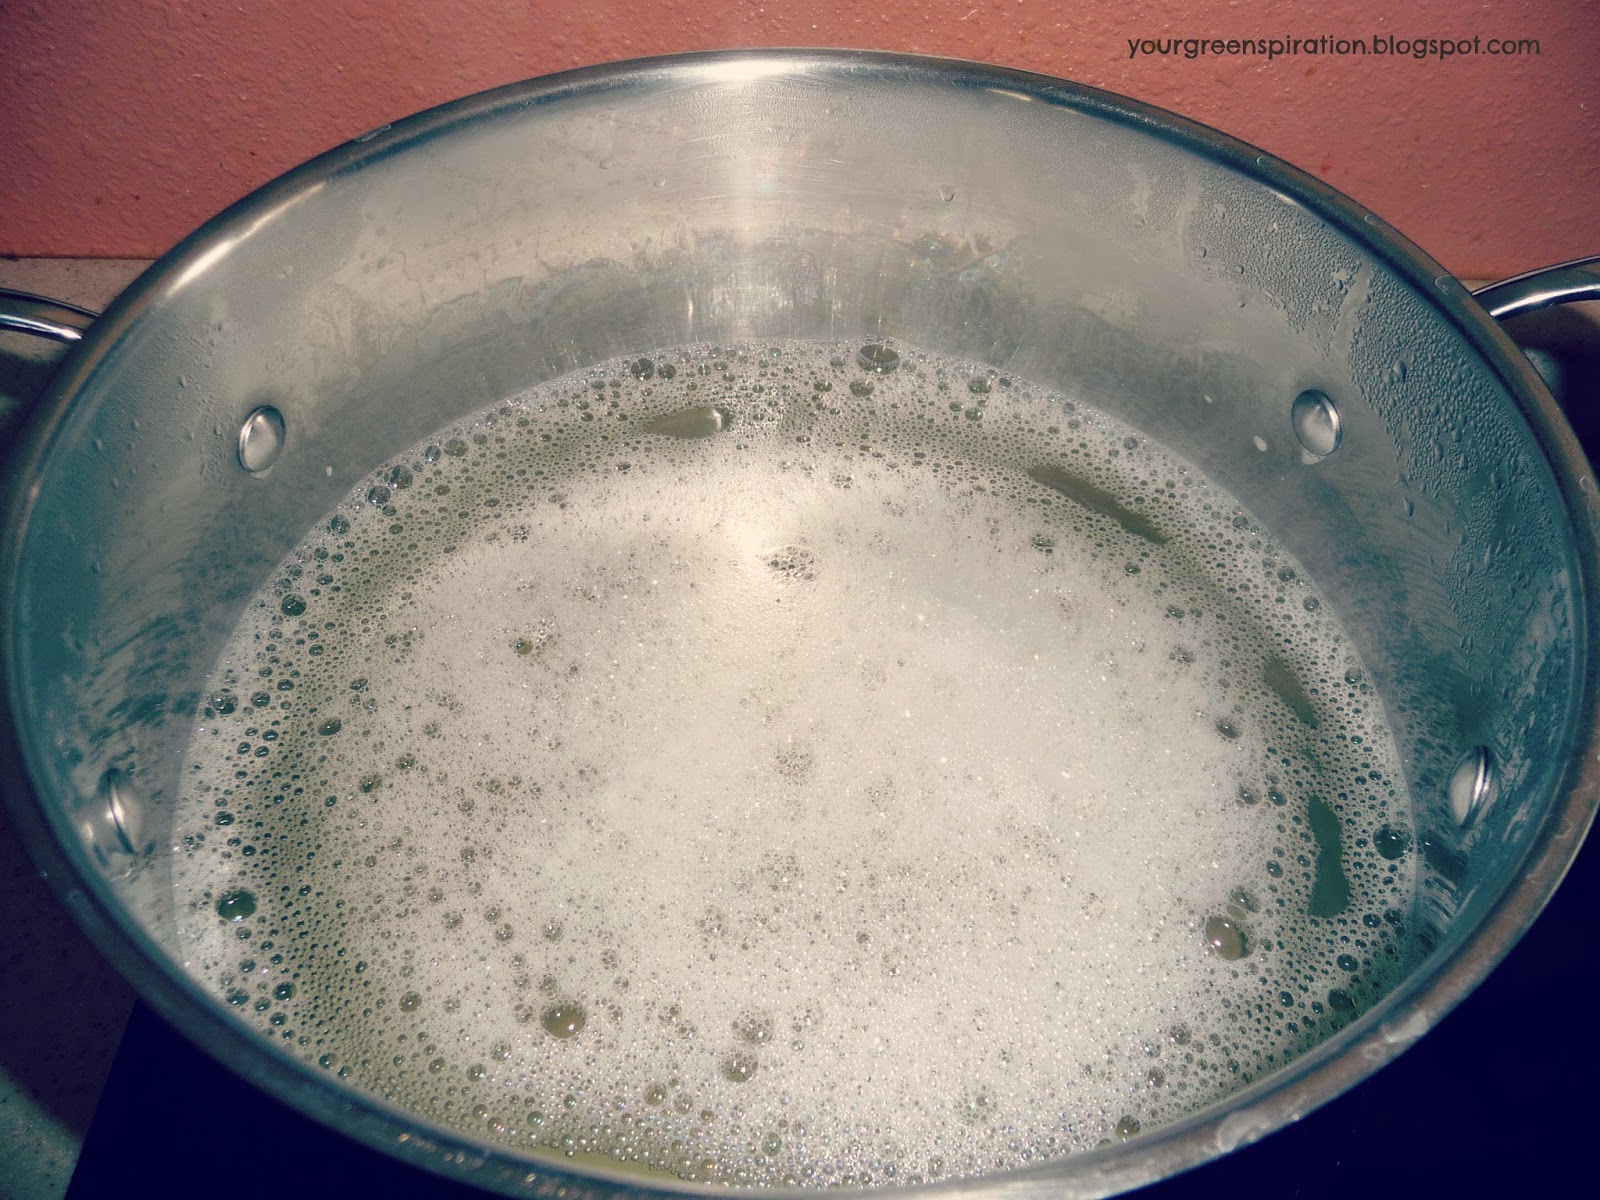
Before using your cup, you will want to boil it for five minutes to sanitize it. Don't boil it for any longer, though. Mine came with a cloth bag for when I'm not using it.

To use, you will need to fold the cup in half with clean hands, then fold it in half again. Then insert, guiding the cup toward the small of your back. Once it is in position, you can gently twist it to make sure it opens up properly. For more detailed instructions, visit the Sckoon website.

It can be tricky to figure out because you have to keep the cup from opening before it is in place.

Menstrual cups can safely be used for up to 12 hours at a time, although you may need to empty it more frequently. Simply remove, pressing on the bottom of the cup to break the seal, and empty the contents into the toilet. Rinse your cup with hot water before re-inserting. After each cycle, it is a good idea to boil your menstrual cup in water for a few minutes and let it air dry.

Many people have had great success with the menstrual cup. And even though I haven't quite gotten used to it yet, I will definitely give the cup a try again sometime in the future.

Order yours here: SckoonCup UK

Cloth pads


I love using cloth pads, and I can't see myself ever going back to disposables. They are much more comfortable, and they don't contain irritating chemicals. Sure, it's a little more work having to wash them and try to keep them out of sight, where someone might accidentally stumble upon the stained pads. But it's totally worth it. Even though they cost a nice chunk of money initially, they will last many years and save you cash in the long run. Plus, they come in cute patterns (who cares if you're the only one who will see them?!).

Again, I decided to order from Sckoon because they use organic cotton and they seem to be made to last a long time. If you're really ambitious, you could probably make your own cloth pads for super cheap, but that seems like way too much work to me.

At first, I only ordered three pads just to see if I liked them. Then I ordered five more, and eight seems to be the perfect number for me. They come in mini, day, and night sizes, but all mine are the day size, which has worked out well.

How to use cloth pads

To use, simply set the pad on your underwear, and snap the flaps together underneath. The patterned side will be touching your underwear, with the white insert facing up (naturally, you will want to wash the inserts a couple times before the first use). I have found that I can wear a cloth pad longer than a disposable one, because as long as you aren't bleeding heavily through the layers, you can re-fold the insert once or twice before changing to a new pad. This is very handy when you're not in the comfort of your own home. Bonus: They don't make that awkward crinkling noise when you're re-folding or changing them.

After I am done using a cloth pad, I like to rinse the insert (and the pad, if needed) with cold water in the sink. Then I will place it in a bucket of cold water and cover it with a lid while it soaks. I wash all the pads after each cycle.

Order yours here: Sckoon Organic Reusable Cloth Pads

Built-in panty liners


When I placed my order for the cloth pads and menstrual cup, I decided to try Sckoon's underwear with built-in panty liners for light days. They work great, but it's probably unnecessary to spend money on new underwear that are just going to get stained - you might as well save a few pairs of old underwear for this purpose.

These are a little tight around the waist, and a little too high, as well. They do the job, but personally, I would suggest saving your money.

~ ~ ~

**Disclosure: Although this post may contain affiliate links, all opinions are my own.

Your challenge: This week, think about greening your period and making the switch to reusable feminine products.
______________________________________________________

**This post is part of a weekly challenge {Go Green in 2014}, during which the author has challenged herself - and you - to find 52 ways to lead a greener life in 2014. You can follow the weekly posts on this page.**

Monday, March 24, 2014

Whipped Body Butter Recipe for Naturally Smooth Skin

Go Green in 2014: Week 12


If you are anything like me, you probably slather your body and hands with lotion on a daily basis. This winter has been drier than any other, and I found myself using even more lotion than usual. However, regular store-bought products contain chemicals that soak into your pores and into your bloodstream, potentially causing your body harm.

Last summer, I started using BomaSense Face and Body Lotion, which worked fine as an overall body lotion (although it made my face really greasy!). However, as the air got drier, I found that this thin, almost watery lotion didn't work as well, and my skin got really dry and itchy. So, I decided to make my own body butter in an attempt to hydrate my skin more over the winter.

How to make whipped body butter

Ingredients:


Step 1: Heat the coconut oil and shea butter in a double boiler, stirring occasionally, until they are completely melted.


Step 2: Transfer to a heat safe bowl, then place in the refrigerator until it has completely cooled (it will have hardened again).


Step 3: Add the rest of the ingredients, if desired. For my first batch, I left it without any additional ingredients to see how it would turn out. Using an electric mixer with a whisk attachment, whisk the mixture until it is light and fluffy. Beware! This is messy... I ended up with splatters of body butter on my countertop, backsplash, and refrigerator cabinet.


Step 4: Spoon the mixture into a container of your choice. I used a wide mouth mason jar, which works perfectly for me. I just scoop it out with my hands and rub them together to warm the body butter before applying it to my body.


What's the verdict on the whipped body butter?

For the most part, it works pretty well. It can be very greasy if you use too much, and I personally wouldn't use it on my face, although it could work fine for you. When it touches your skin, it will turn into a runny oil, so be warned!

Whipped body butter, like any moisturizer, works best if applied right after a shower to trap in moisture. Your skin will look shiny, and it will feel oily for a minute, but the body butter absorbs quickly. After using it for about six weeks, my skin feels soft and smooth. Coconut oil and shea butter can be healing for a number of skin conditions. It is even safe to use on babies to heal eczema or diaper rash, although I can't confirm how well it works in these instances.

However, I have found that it doesn't work well as a hand lotion - in my opinion, anyway. It isn't thick and creamy like lotion, and it leaves my hands feeling oily. Maybe it would feel better if I had added some vitamin E oil; next time, I think I will try adding that and some essential oils (shea butter doesn't smell the greatest!). Or, you could try this lotion bar recipe for moisturizing your hands.

Because this recipe doesn't contain water, it will last quite a while. I would try to use it within six months, though. If you can't use it that quickly, try cutting the recipe in half.

~ ~ ~

**Disclosure: Although this post may contain affiliate links, all opinions are my own.

Your challenge: This week, think about tossing the chemical-laden body lotion (or wait until the bottle is empty) and make your own whipped body butter.
______________________________________________________

**This post is part of a weekly challenge {Go Green in 2014}, during which the author has challenged herself - and you - to find 52 ways to lead a greener life in 2014. You can follow the weekly posts on this page.**

Monday, March 17, 2014

Go Green With Your Floor Cleaning

Go Green in 2014: Week 11

By now, you are probably aware of the dangers of using chemical-laden store-bought cleaning products in your home, from the environmental toxicity to personal health hazards. So today, we will go over some ways you can go green with your floor cleaning, from the carpets to the tile and hardwood. I will give you a cheap, easy recipe for making your own carpet deodorizer, a no-rinse recipe for cleaning your hard flooring, and some ideas for DIY Swiffer replacement pads.

Green cleaning for carpeted floors & rugs


It doesn't get any easier than this: Sprinkle baking soda on your carpeting, let sit for fifteen minutes, and vacuum it up. If you would like to add a fresh scent to the deodorizer, mix 20-25 drops of your favorite essential oil with one cup of baking soda. You can adjust these quantities depending on your needs and how strong you would like the scent. I have a plastic container with holes in the cover, which makes it easy to sprinkle the powder on my carpeting. But if you don't have something like this, you can either use a spoon or keep your deodorizer in a mason jar with holes poked in the top.

Green stain remover

Got stains? It's best if you can take care of them right away... Using a clean cloth, blot as much of the moisture from the carpet as you can.

Mix together one part baking soda and one part Borax. Sprinkle it on the stain and use a clean, damp cloth to gently agitate it, then blot. Repeat as needed. For tough stains, add a little water to the mixture to form a paste, then let it sit for ten minutes before gently wiping clean.

Tip: Test the carpet deodorizer and stain remover in an inconspicuous area (like a corner), if possible, to make sure it won't make the situation worse.

Green cleaning for hard floor surfaces


This recipe can be used as a light-duty cleaner for hardwood, laminate, tile, and any other hard flooring in your home. There is no need to rinse.

No-rinse green floor cleaner

Ingredients:

  • 1/8 cup distilled white vinegar
  • 5-10 drops lavender essential oil
  • 5 drops each eucalyptus, rosemary oil (optional)

Directions:

  1. Mix ingredients in a bucket with one gallon warm water. 
  2. Clean your floors and either let air dry or wipe with a clean, dry cloth.

Optionally, you can mix up a big batch of floor cleaner and keep it in an empty container for convenience. I keep mine in a vinegar bottle (I think I may have added some water to help dilute it and fill up the bottle). Do whatever works for you!

There may be times when you need a heavier duty cleaner; see the link below for more green floor cleaning ideas.

Green cleaning: Healthier alternatives to floor cleaners

DIY Swiffer replacement pad ideas


Fun tidbit: Just as I was about to start writing this section, an advertisement for Swiffer sweepers interrupted my music on Pandora radio. :)

Do you have a Swiffer sweeper/mop? I bought one a while back, thinking it would be a great way to clean my floors in a hurry. Well, to be honest, neither their sweeping pads nor their mopping pads hold a whole lot of dirt, and they aren't exactly cheap to replace.

Now, I'm not really into the chemicals in the replacement pads, anyway, so I decided to try making my own green, thrifty alternatives. I saved a ton of money using items I already owned. Maybe you will, too.

You know those old, stretchy chenille socks sitting at the bottom of your sock drawer? They work perfectly as Swiffer replacement pads! Simply dampen them in the DIY floor cleaner above and stretch them over the head of the mop. Clean your floor as usual, replacing with the other sock when needed.

The best part is that you can wash the socks with the rest of your laundry and reuse over and over again.

You could even use the dry socks to sweep the floor, although I prefer to use a regular broom for sweeping.

For more DIY Swiffer replacement pad ideas, visit the link below.


~ ~ ~

Your challenge: This week, consider cleaning your floors with non-toxic ingredients that you already have in the house, such as baking soda and vinegar.

Check out this awesome Pinterest board for ideas: Make your own green cleaning products
______________________________________________________

**This post is part of a weekly challenge {Go Green in 2014}, during which the author has challenged herself - and you - to find 52 ways to lead a greener life in 2014. You can follow the weekly posts on this page.**
Related Posts Plugin for WordPress, Blogger...